Every Game Boy owner knows the boot sequence. Flip the power switch, hear the ba-ding, watch the Nintendo logo scroll down the screen. What most people don’t realise is that this entire ceremony lives in a tiny 256-byte program baked into the console’s silicon. The boot ROM.
The Boot ROM Link to heading
Following on from my previous post on the Game Boy’s CPU architecture, I built something entirely unnecessary for my emulator: a custom boot ROM generator that replaces the Nintendo logo with arbitrary text, all while respecting the same 256-byte constraint.
When the Game Boy powers on, the CPU doesn’t immediately execute your cartridge. It begins at address 0x0000, which initially maps to a hidden, read-only piece of firmware built into the console. This firmware:
- Initialises hardware (stack pointer, audio registers, LCD)
- Reads the Nintendo logo from the cartridge header and renders it with a scroll animation
- Validates that logo data matches what Nintendo expects (an anti-piracy measure)
- Writes
0x01to register0xFF50, which unmaps the boot ROM from the address space entirely, then jumps to the cartridge entry point at0x0100
After that final write, the boot ROM ceases to exist in the memory map. Address 0x0000 now points to the cartridge. A program whose last act is to erase itself.
If no cartridge is inserted, the cartridge header reads back as 0xFF (the open bus value). The boot ROM still attempts to render the “logo” from this garbage data, which produces a solid black rectangle where the Nintendo logo should be. The checksum then fails, and the boot ROM locks into an infinite loop. No crash screen, no error message. The console just sits there with a black bar on screen, refusing to proceed. You may remember this behaviour from your childhood.
This checksum was also Nintendo’s anti-piracy mechanism. The boot ROM compares the logo bytes in the cartridge header against a copy of the Nintendo logo stored in the boot ROM itself. If they don’t match, the console halts. Every legitimate cartridge must contain an exact copy of the Nintendo logo in its header at 0x0104-0x0133 just to boot. And since the Nintendo logo is trademarked, any unlicensed manufacturer embedding it in their cartridge would be infringing on Nintendo’s trademark, giving Nintendo legal grounds to act even if they couldn’t prove copyright infringement on the game itself. A clever bit of legal engineering disguised as a technical check1.
Dirty or oxidised cartridge connectors trigger the same failure mode. Since the logo is read from the cartridge, even a single flipped bit produces a garbled image on screen. The scroll animation still plays, but the logo is a mess of random tiles. Sometimes it looks almost right but fails the byte comparison and locks up. The universal fix: pull the cartridge out, blow on the contacts, reseat it. The boot ROM’s strict validation made it an accidental connector quality test.
I simulated a few of these failure modes by deliberately corrupting the logo data baked into the boot ROM itself and running it through my emulator:
The original boot ROM was never meant to be dumped or studied. It’s burned into the chip. But the reverse engineering community has documented it thoroughly23, and the disassembled source is publicly available4. Emulator developers can use this knowledge or write their own.
Why Bother? Link to heading
I did this for the fun of understanding how it works at the lowest level. Fitting working code into 256 bytes, with every byte accounted for, is a satisfying puzzle.
The original Nintendo boot ROM is copyrighted, and distributing it with an emulator is legally murky. A custom one sidesteps that entirely. But honestly, I’m not distributing my emulator anyway.
The goal: a Go package that programmatically generates valid boot ROMs with custom text. Pass it "FOOBAR" and get back 256 bytes of working machine code.
The 256-Byte Constraint Link to heading
A Game Boy boot ROM is exactly 256 bytes. The hardware maps 0x0000 through 0x00FF and nothing more. Within this space you need:
- Hardware initialisation
- A font (pixel data for each character)
- Tile copy code
- Tilemap setup
- LCD configuration
- A visible delay
- The boot ROM disable sequence
Tight.
Stack Pointer Link to heading
The first thing any Game Boy program does:
0x00: LD SP, $FFFE ; 31 FE FF
Three bytes. Stack grows downward from the top of high RAM. Same as the original.
Clearing VRAM Link to heading
Video memory spans 0x8000 to 0x9FFF (8KB). Without clearing it, whatever garbage was in memory from the previous power cycle renders as corrupted tiles.
0x03: XOR A           ; AF           A = 0
0x04: LD HL, $9FFF    ; 21 FF 9F     Start at end of VRAM
0x07: LD (HL-), A     ; 32           Store 0, decrement HL
0x08: BIT 7, H        ; CB 7C        Check if H >= $80 (still in VRAM?)
0x0A: JR NZ, -5       ; 20 FB        Loop until done
Start at the end, work backwards. The loop terminates when H drops below 0x80, meaning HL has passed 0x8000. Nine bytes for a complete VRAM clear by exploiting the address range rather than maintaining a separate counter. We’re 12 bytes in. Every byte matters at this scale.
Audio Registers Link to heading
The original boot ROM configures the sound hardware for the startup chime. Even if you don’t play sound during boot, some games expect these registers to be in specific states when they start:
0x0C: LD A, $80       ; 3E 80
0x0E: LD ($FF26), A   ; E0 26        Enable sound system
0x10: LD ($FF11), A   ; E0 11        Sound length
0x12: LD A, $F3       ; 3E F3
0x14: LD ($FF12), A   ; E0 12        Volume envelope
0x16: LD ($FF25), A   ; E0 25        Output terminals
0x18: LD A, $77       ; 3E 77
0x1A: LD ($FF24), A   ; E0 24        Channel volume
Skip these and you break compatibility with titles that don’t initialise their own audio. Prehistorik Man is the classic example. Its sound engine assumes NR50 and NR51 are already set to the boot ROM’s values and never writes them itself, so you can’t skip this.
The Font Link to heading
The Game Boy has no text mode. It’s entirely tile-based: the screen is a 20×18 grid of 8×8 pixel tiles. If you want text, you provide the pixel data yourself.
Each tile is 8×8 pixels at 2 bits per pixel (4 possible colours). The encoding uses two bytes per row: a low byte and a high byte. For each pixel position, bit 0 comes from the low byte, bit 1 from the high byte5.
The letter ‘M’, for instance:
Row pixels:           Low byte  High byte
. ■ . . . ■ . .      0x44      0x44
. ■ ■ . ■ ■ . .      0x6C      0x6C
. ■ . ■ . ■ . .      0x54      0x54
. ■ . . . ■ . .      0x44      0x44
. ■ . . . ■ . .      0x44      0x44
. ■ . . . ■ . .      0x44      0x44
. ■ . . . ■ . .      0x44      0x44
. . . . . . . .      0x00      0x00
Since I only use colour 3 (black, or technically dark green) on colour 0 (white, technically light green), the low and high bytes are always identical. 16 bytes per character.
In Go, each glyph is defined as a pattern array and converted programmatically:
Font['M'] = FromPattern([8][8]uint8{
    {0, 3, 0, 0, 0, 3, 0, 0},
    {0, 3, 3, 0, 3, 3, 0, 0},
    {0, 3, 0, 3, 0, 3, 0, 0},
    {0, 3, 0, 0, 0, 3, 0, 0},
    {0, 3, 0, 0, 0, 3, 0, 0},
    {0, 3, 0, 0, 0, 3, 0, 0},
    {0, 3, 0, 0, 0, 3, 0, 0},
    {0, 0, 0, 0, 0, 0, 0, 0},
})
The FromPattern function converts this into the 16-byte 2bpp format the hardware expects, with each row producing a low byte and high byte pair.
One subtle detail: a blank tile (16 zero bytes) is prepended at tile index 0. Since we cleared VRAM, including the tilemap, every tilemap entry points to tile 0. With a blank tile there, the cleared screen renders as empty white rather than garbage. Character tiles start at index 1.
Copying Tiles to VRAM Link to heading
Tile data sits in the ROM itself and gets copied to VRAM at 0x8000:
LD HL, $8000        ; Destination
LD DE, <tileAddr>   ; Source (embedded in ROM)
LD BC, <size>       ; Byte count
CopyLoop:
  LD A, (DE)        ; Read from ROM
  LD (HL+), A       ; Write to VRAM
  INC DE            ; Next source byte
  DEC BC            ; Decrement counter
  LD A, B           ; Check BC == 0
  OR C
  JR NZ, CopyLoop
The LD A, B / OR C idiom is the standard way to test a 16-bit register pair for zero on the Game Boy. There’s no single instruction for it. At this point we’re 56 bytes deep with 200 to go, and we haven’t stored a single pixel of font data yet.
The Tilemap Link to heading
Tiles in VRAM don’t appear on screen until their indices are written to the background tilemap at 0x9800. The map is 32 tiles wide, though only 20 are visible on the 160px screen.
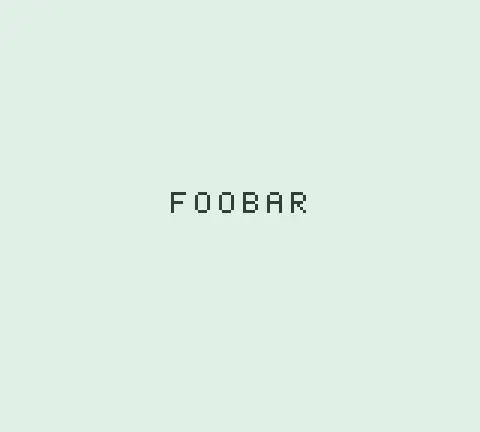
To centre “FOOBAR” (6 characters) on row 8:
- Column = (20 - 6) / 2 = 7
- Address =
0x9800+ (8 × 32) + 7 =0x9907
LD HL, $9907        ; Tilemap position
LD A, 1             ; First character tile index
LD B, 6             ; Character count
WriteLoop:
  LD (HL+), A       ; Write tile index
  INC A             ; Next tile
  DEC B
  JR NZ, WriteLoop
Because tiles are stored sequentially, a simple incrementing loop works. No lookup table needed.
LCD On Link to heading
LD A, $FC           ; 3E FC
LD ($FF47), A       ; BGP: palette (black on white)
LD A, $91           ; 3E 91
LD ($FF40), A       ; LCDC: LCD on, background enabled
The palette 0xFC maps colour 0 to white, colours 1-3 to black. Our font uses only 0 and 3, giving us crisp black text on a white background. The moment LCDC is written, pixels appear.
Delay Link to heading
Without a pause, the boot ROM would disable itself before a single frame renders:
LD BC, $FFFF        ; 65535 iterations
DelayLoop:
  DEC BC
  LD A, B
  OR C
  JR NZ, DelayLoop
At ~1M machine cycles per second, this gives roughly 400ms of visibility. Not as dramatic as the original’s scrolling animation, but enough.
One constraint: the boot disable sequence must always sit at exactly 0xFC-0xFF. The generator handles this with a JP $00FC after the delay loop, jumping directly to the disable sequence regardless of how much space remains. Every section’s byte count still has to be tracked to ensure nothing overflows past 0xFC.
The Disappearing Act Link to heading
The last 4 bytes of the ROM, always at 0xFC:
0xFC: LD A, $01       ; 3E 01
0xFE: LD ($FF50), A   ; E0 50
That write to 0xFF50 unmaps the boot ROM. The program counter moves to 0x0100, the cartridge entry point. Control transfers seamlessly.
A single write-once latch. 256 bytes of ROM vanish from the address map. The hardware equivalent of a program deleting its own executable.
The Generator Link to heading
Rather than editing hex by hand, a Go function assembles the entire boot ROM programmatically:
func GenerateCustomBootROM(text string) ([]byte, error) {
    rom := make([]byte, 256)
    pos := 0

    // LD SP, $FFFE
    rom[pos] = 0x31; pos++
    rom[pos] = 0xFE; pos++
    rom[pos] = 0xFF; pos++

    // ... VRAM clear, audio init, tile copy, tilemap, LCD ...

    // Always at 0xFC: boot complete
    rom[0xFC] = 0x3E
    rom[0xFD] = 0x01
    rom[0xFE] = 0xE0
    rom[0xFF] = 0x50

    return rom, nil
}
The function validates input, generates tile data, computes all addresses dynamically, and packs everything into the 256-byte budget. The tile data lands between the copy code and the tilemap setup, with offsets calculated at generation time.
go run . --boot-text "FOOBAR"
The --boot-text flag is optional. Without it, the emulator uses the original Nintendo boot ROM by default, complete with the scroll animation and chime. The custom generator only kicks in when you explicitly ask for it.
Fresh boot ROM generated on the fly, custom text on screen, then straight into whatever cartridge is loaded.
Memory Layout Link to heading
| Address | Contents | Size |
|---|---|---|
0x00-0x02 | Stack pointer init | 3 bytes |
0x03-0x0B | VRAM clear | 9 bytes |
0x0C-0x1B | Audio init | 16 bytes |
0x1C-0x26 | Alignment padding | 11 bytes |
0x27-0x37 | Tile copy code | 17 bytes |
0x38-0xA7 | Tile data (varies by text) | ≤144 bytes |
0xA8-0xB3 | Tilemap write | 12 bytes |
0xB4-0xBB | LCD config | 8 bytes |
0xBC-0xC3 | Delay loop | 8 bytes |
0xC4-0xC6 | JP to boot disable | 3 bytes |
0xFC-0xFF | Boot ROM disable | 4 bytes |
Six characters of text costs 112 bytes of tile data (7 tiles × 16 bytes, including the blank). Eight characters pushes it to 144. It fits either way, but only just.
Why 8 Characters? Link to heading
You might wonder how the original boot ROM manages the full Nintendo logo plus a ® symbol in the same 256 bytes. The trick: it doesn’t store the logo as tile graphics. The Nintendo logo lives in the cartridge header at 0x0104-0x0133 as 48 raw bytes. The boot ROM reads those bytes from the cartridge, decompresses them on the fly, and copies the expanded tiles into VRAM for the scroll animation. Then it reads those same cartridge bytes again and compares them against a 48-byte copy baked into the boot ROM’s own firmware. If any byte differs, it halts. Two operations, one data source from the cartridge, one reference copy in the boot ROM. The boot ROM never needs to store pre-rendered tile graphics for the logo.
Those 48 bytes also use a compressed format. Each byte encodes a 4×2 pixel block rather than a full tile row, and the boot ROM’s rendering code expands it to full size during the VRAM copy. So 48 bytes of cartridge data produces a much larger visual than you’d expect.
My custom boot ROM can’t pull the same trick. The text isn’t in any cartridge header, so the font has to live in the ROM itself. And I’m using standard uncompressed 8×8 tiles at 16 bytes each rather than writing a custom decompression routine. I could fit more characters with a similar compression scheme, but the decompressor code would eat into the bytes saved. Eight characters is where the budget runs out.
Lessons from 256 Bytes Link to heading
The hardware doesn’t forgive mistakes. Write to LCDC before your tiles are in VRAM and you get garbage. Forget to clear the tilemap and leftover data renders as corrupted sprites. No OS catches these for you.
Go turned out to work well for this. Writing raw bytes into a []byte feels appropriately low-level, but having proper error handling and test infrastructure around it beats a hex editor by a wide margin. The generator has unit tests and integration tests that boot the ROM in the emulator and verify the correct tiles land in VRAM.

Logo check legal implications, Pan Docs ↩︎
The Game Boy Bootstrap ROM, Pan Docs ↩︎
Gameboy Bootstrap ROM, GBDev Wiki ↩︎